Accounts Payable
Introduction
The Accounts Payable (AP) module in 1ERP is a comprehensive system that enables businesses to effectively manage their payables and maintain strong vendor relationships, streamlining the entire process, from entering and tracking invoices to making payments and maintaining accurate financial records.
Set Up Accounts Payable
To set up the AP module and the General Ledger Accounts, please watch the 1ERP Initial Setup video. It is recommended to set up the AP Journal accounts before using the AP system.
Processes in AP
Generate Bills
The "Bills" screen provides the functionality to automatically and manually generate bills.
Automatic
From Subsystems: Receive bills automatically from subsystems such as Expense Report, Payroll, and Fixed Asset. This integration streamlines the bill entry process, capturing relevant information seamlessly from these subsystems.
Recurring Entry: Generate and track recurring bills through the "Recurring Bill" screen. This feature enables the system to create periodic bills based on predefined schedules, reducing manual effort and generating accurate billing for recurring expenses.
Manual
Enter bills manually on an ad-hoc basis. This enables the flexibility to handle unique or one-time expenses that may not be captured through automated processes. A sample bill from the AP system is shown for reference:

When entering the bill information, it is highly recommended to import the original or imaged bill. This practice facilitates easy reference and provides necessary documentation for audits and when addressing inquiries related to the bill. By maintaining a comprehensive record of bills, including the original or imaged bill, organizations can enhance transparency, compliance, and overall financial management.
Create Payments for Bills
Once a bill is entered and finalized, a corresponding record will appear in the "Pay Bills" screen. In this screen, you have the option to select the payment date and determine whether to make a partial or full payment for the bill.
The "Pay Bill" screen provides the flexibility to manage payments efficiently, allowing you to choose the payment date, determine the payment amount, and control how bills are grouped for payment. This functionality enables better control over your organization's cash flow and enhances the accuracy and convenience of bill payment procedures.
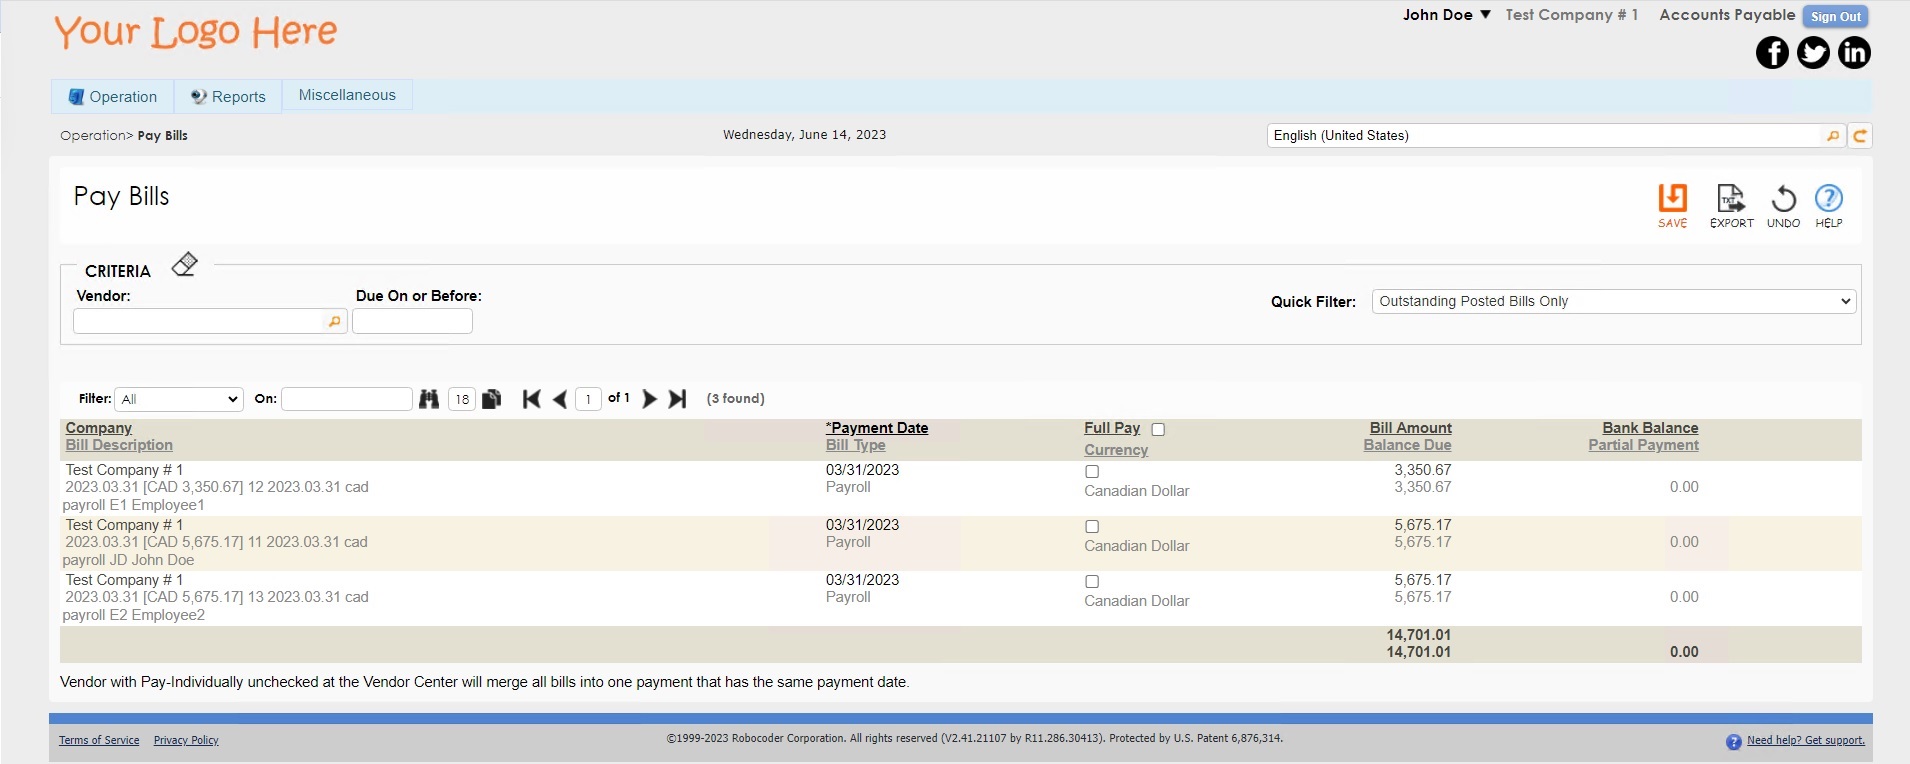
Pay in Full
-
Select the “Vendor” or leave it blank to show bills from all vendors. This filter brings up all the outstanding bills associated with the selected vendor.
-
Cick on the "Full Pay" checkbox in the corresponding line item to select individual bills to pay in full OR click on the “Full Pay” checkbox in the table header to pay all bills in the table.
-
Click on Save to create payments for the selected bills.
Pay in Partial
-
Select the “Vendor” or leave it blank to show bills from all vendors. This filter brings up all the outstanding bills associated with the selected vendor.
-
Enter the desired pay amount in the “Partial Payment” field. Leave this empty if the bill is to be paid in full.
-
Click on Save to create payments for the selected bills.
Bills with Same Date/Payee
If there are multiple bills with the same payment date and payees, the system will automatically group them into a single payment by default. This grouping simplifies the payment process and helps streamline financial transactions.
If bills from a vendor need to be paid individually, this can be specified in the Vendor Centre under Miscellaneous using using the "Pay Individually" option. This ensures that bills from the selected vendor are treated separately and not grouped with other bills during the payment process.
Pay Bills
The final stage of the payment process is the "Payments" screen.
Retrieve Payment Records
- Select "No" for both the "Finalized" and "Voided" criteria.
- Choose "All Dates" in the Quick Filter option.
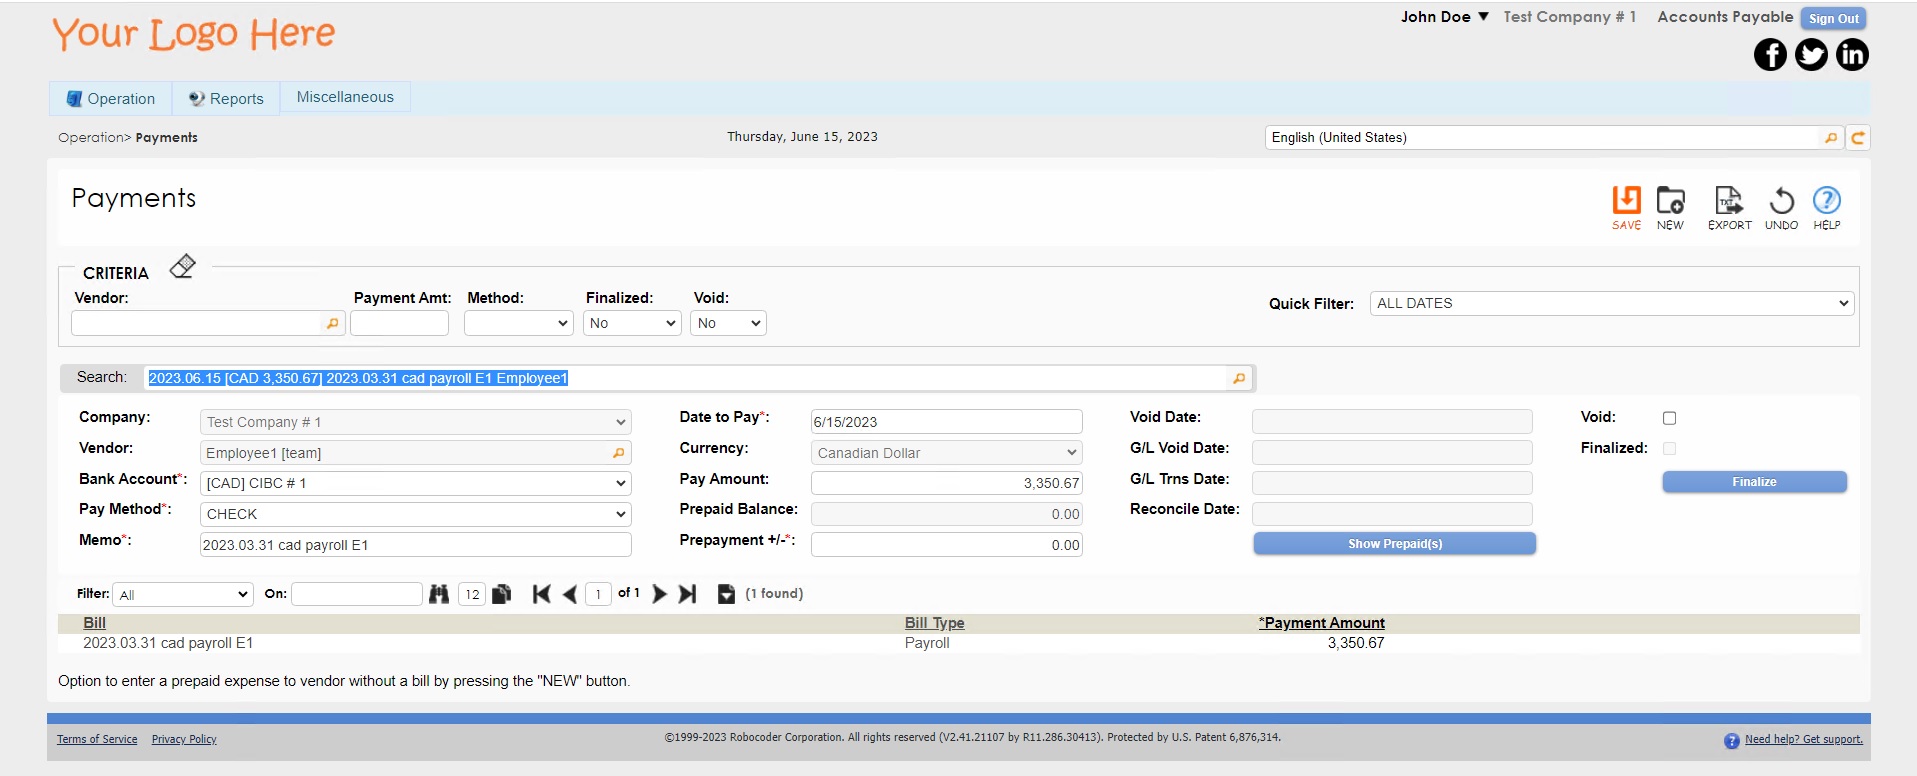
Set Up Bill Payment
- Select the bill for the vendor which is to be paid.
- Entering the Bank Account and Pay Method (a corresponding record will appear in the "Payment" screen).
- Click on the “Finalize” button to finalize and post the payment to General Ledger (G/L). If the "CHECK" payment method is selected, finalizing the payment will prepare the cheque.
Note: exercise caution when clicking on the "Finalize" button, especially for payments made via EFT/ACH. Only press this when it is certain that the payment has been successfully processed.
Prepaid Expenses
The "Payments" screen also provides an option to enter a prepaid expense to a vendor without a generated bill. To create a prepaid expense, press the "NEW" button on this screen to enter the relevant details for the prepaid expense. To review all prepaid vendors and their amounts in their respective currencies, click on the "Show Prepaid(s)" button.
Use Checks Payment Method
In the "Payments" screen, you can modify the payment date and method for the selected payment record. If the payment method chosen is "CHECK," a corresponding cheque record will be prepared.
Note: ensure that the RCDesign.dbo.Printer.PrinterPath matches the exact name on the LAN, especially for cheque printers that have authorized signatures burned into the MICR cartridge filled with a special toner powder designed for check printing.
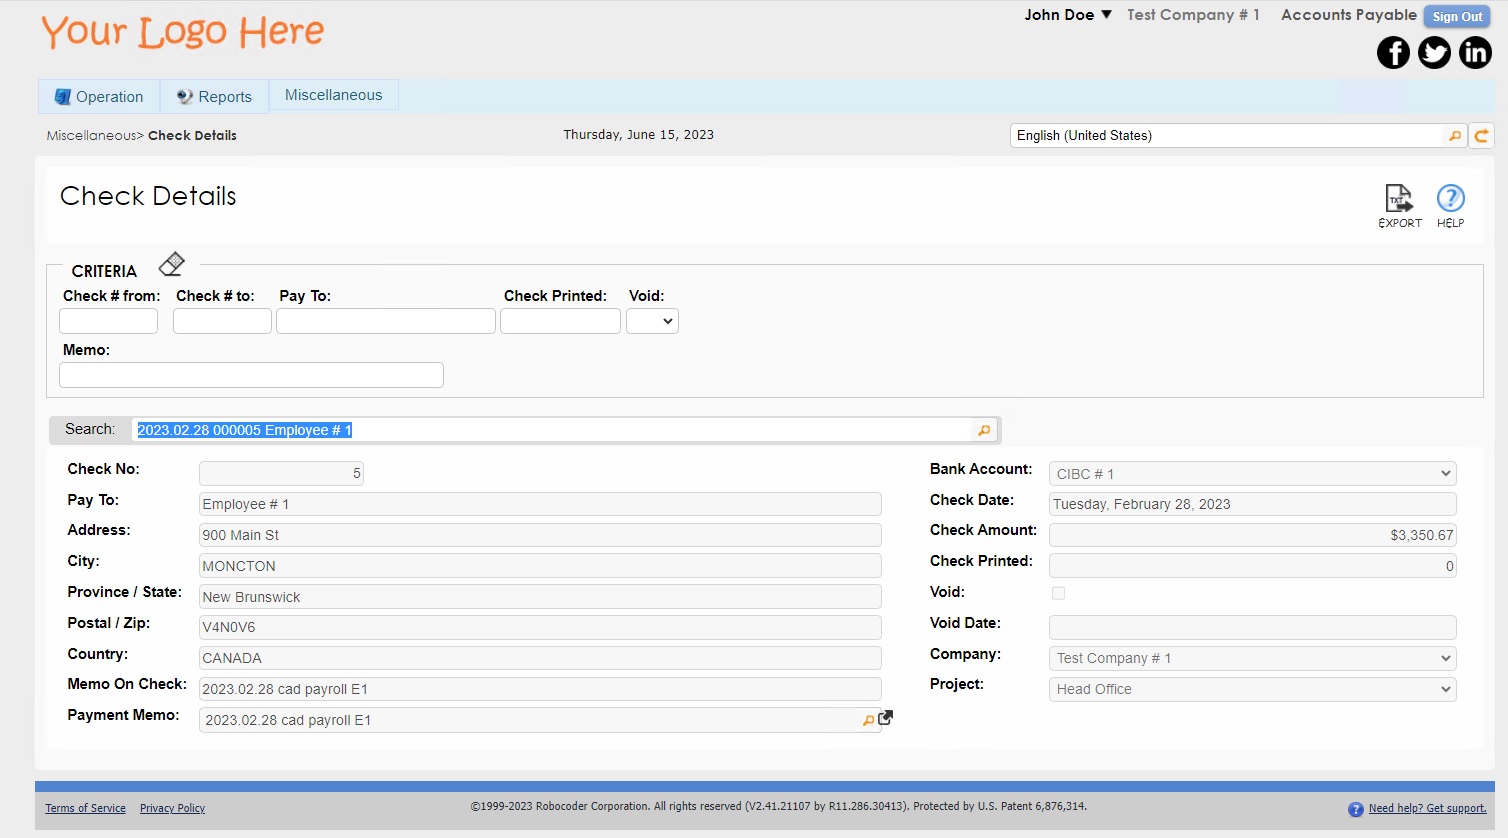
See Check Details
Please navigate to the “Check Details” screen under the “Miscellaneous” menu to see details about each individual check.
"Check Printed" Count
The initial count for the number of times the cheque has been printed starts at zero. This count is incremented only when the cheque is printed using a designated cheque printer that is marked as "Y" in the RCDesign.dbo.Printer.UpdatePrinted database field.
Print Checks
Access the "Print Checks" screen to print checks that have not been printed yet (i.e., with a # of "Check Printed" Count of 0) or enter a range of cheque numbers to be printed again. Select the designated printer for check printing.
Reports in AP
The Accounts Payable module has numerous reports that provide up-to-date information on all of your AP related activities.
Vendor List
A Vendor List can be exported from the vendor information screen. Use Vendor Center under the Miscellaneous menu and leave the search bar empty. Click on the "Export" button to generate a list of all vendors in an Excel spreadsheet.
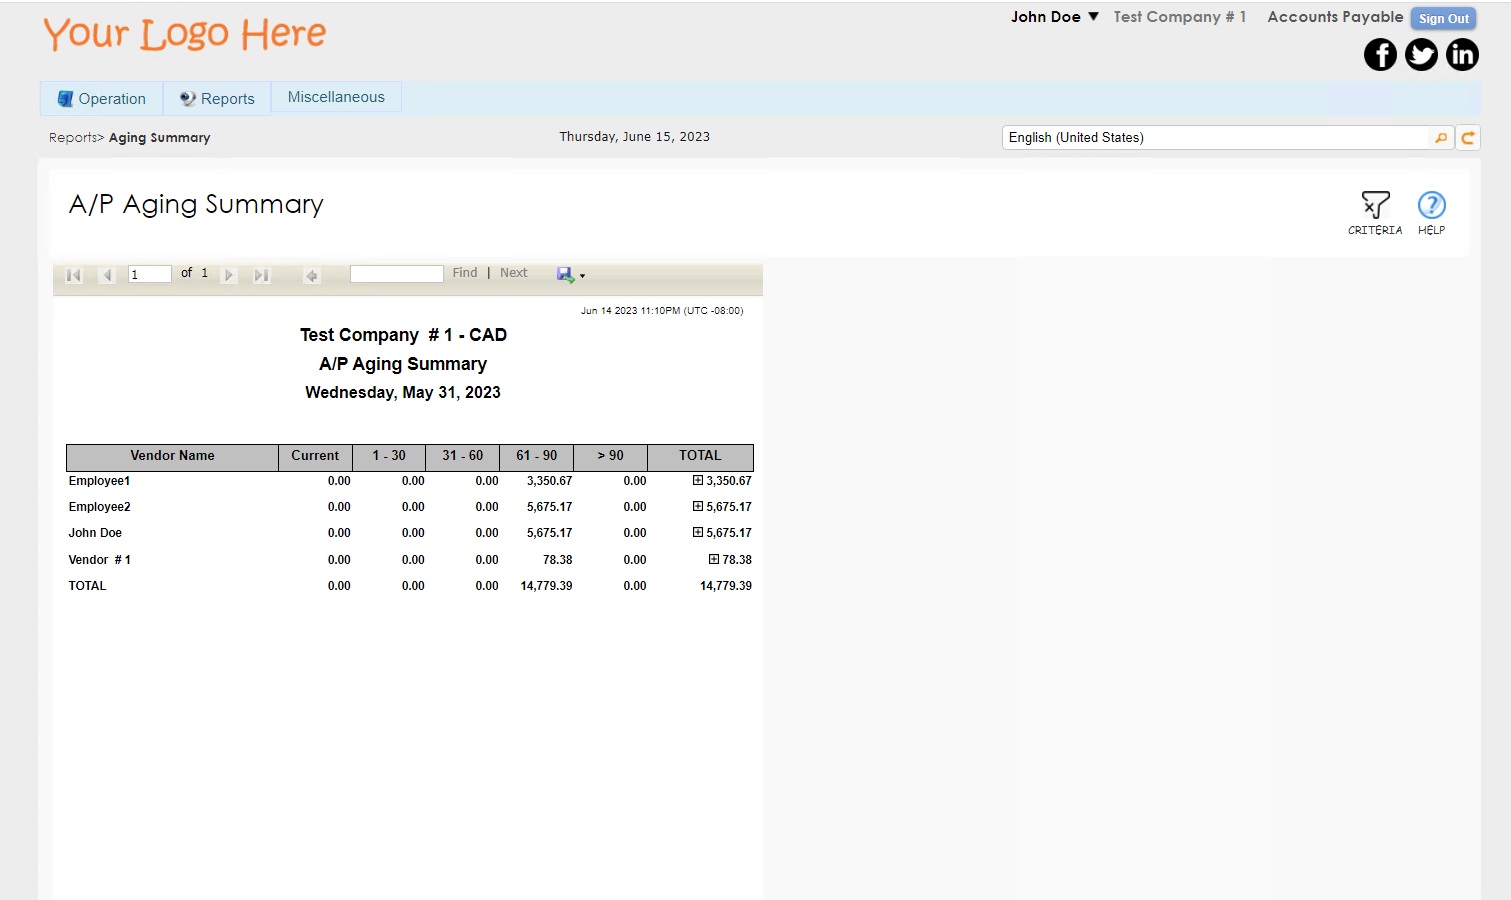
Aging Summary
The Aging Summary report is used to review and analyze outstanding payables. This report helps users to understand outstanding payables, interest charges and identify any discrepancies based on a given period. Transactions and balances are grouped by their due dates into aging categories.
Unpaid Bills
The Unpaid Bills collection report is a powerful report to retrieve a list of unpaid bills for a given period. Users can choose a single Vendor or leave the vendor field empty to show all vendors who satisfy the unpaid bills conditions.
Transaction Listing Report
The Transaction Listing Report in the Accounts Payables Module provides a comprehensive overview of financial transactions related to payables. This report compiles a detailed list of all transactions, including Bills, payments, credits, and debits, within a specified time frame.